Posted: 4/23/2020
In today’s post I will show you how to create simple connection between your ASP.NET Web Application and Azure Service Bus. Step-by-step - from creating a proper resource in the Portal through implementation in .NET Core 3.1 to sending a message which will be added to Service Bus Queue.
Source code
- Github - ServiceBusExample
What you need?
- Azure Subscription
- Visual Studio 2019
- .NET Core 3.1
Create Azure Service Bus Queue
First step is to create the Azure Service Bus Queue. In order to do that go to Azure portal, click Create a resource and search for the Service Bus. Create resource with the name and location of your choice and Basic price tier (it’s enough for tutorial purposes - differencies between pricing tiers you can find here - Azure Service Bus Pricing).
When the deployment of your service is done, it’s time to create a queue. Go to your resource and click on Queue button in the Overview section. Type the name of your queue and set values for queue parameters.

Example parameters for Azure Service Bus Queue.
The last thing you need to do is to create SAS policy for your web app. Go back to Azure Service Bus resource and choose Shared access policies tab. Click on Add icon. Type policy name and choose claims. For this tutorial you will need only Send claim, but if you’re planning to extend your app (or use the same policy for other app) also for listening for service bus messages, choose Manage.
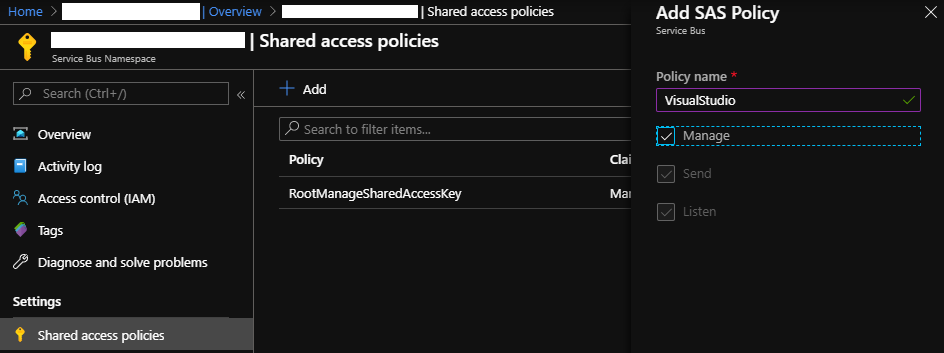
Adding SAS policy to Azure Service Bus.
And it’s done! When you click on the SAS policy you’ve just created, you will see the tokens required to connect to your Service Bus.

SAS policy with keys and connection strings view.
Code
Open Visual Studio (I’m using 2019, but you can use 2017 version as well) and create new project using ASP.NET Web Application template. Provide your project name, click Next and in the next window choose Web Application (Model-View-Controller).

ASP.NET Web Application - MVC project template.
Model
We’ll start the work with defining data model for our message. Typically, messages sent to service bus are really short - it can contains e.g. only ID of the item which needs to be processed by external workers. Because we won’t create any listener for this Service Bus, this will be only a dummy message which user can send using the form in the application page.
public class ServiceBusMessage
{
    public Guid Id { get; set; }
    public string Title { get; set; }
    public string Message { get; set; }

    public ServiceBusMessage()
    {
        Id = Guid.NewGuid();
    }
}
Service
Now we need to create a service, which will be responsible for creating a connection to Service Bus and sending messages to it. We’ll start with the interface - it’s not necessary part but I’m fan of using dependency injection wherever possible.
public interface IServiceBusQueueService
{
    Task SendMessageAsync(ServiceBusMessage serviceBusMessage);
}
Then we need to install required package. Go to package manager console and install Microsoft.Azure.ServiceBus. It contains QueueClient class which we’ll use to create connection to Service Bus.

Microsoft.Azure.ServiceBus in NuGet Package Manager.
Next is time to implement the interface. Create class ServiceBusQueueService and inherit from IServiceBusQueueService. Add two const variables to store credentials. Provide queue name and connection string to Service Bus - you can find it inside SAS policy you’ve created in one of the previous steps. Following service creates new QueueClient based on provided credentials. SendMessageAsync method serializes message object to json and, using client, sends it to Service Bus.
Below you can find working implementation of IServiceBusQueueService. To make code as readable as possible I removed unnecessary elements (like logging). Full code you can find in the repository attached to this blog post.
public class ServiceBusQueueService : IServiceBusQueueService
{
    private const string _serviceBusConnectionString = "your-service-bus-con-string";
    private const string _queueName = "your-queue-name";

    private readonly IQueueClient _queueClient;

    public ServiceBusQueueService()
    {
        _queueClient = new QueueClient(_serviceBusConnectionString, _queueName);
    }

    public async Task SendMessageAsync(ServiceBusMessage serviceBusMessage)
    {
        try
        {
            // Serialize data model and create message.
            string messageBody = JsonSerializer.Serialize(serviceBusMessage);
            var message = new Message(Encoding.UTF8.GetBytes(messageBody));

            // Send the message to the queue.
            await _queueClient.SendAsync(message);

        }
        catch (Exception exception)
        {
            // Log errors
        }
    }
}
Controller
Controller for this tutorial contains only two Create actions - one for the HTTP GET request and second for the HTTP POST. First of them displays form with text inputs for model properties. The second one sends the message with the data that the user entered in the form.
Same as for ServiceBusQueueService I removed parts of the code that do not affect the application running to make it shorter and more readable.
public class ServiceBusMessageController : Controller
{
    private readonly IServiceBusQueueService _queueService;

    public ServiceBusMessageController(IServiceBusQueueService queueService)
    {
        _queueService = queueService;
    }

    public async Task<ActionResult> Create()
    {
        return View();
    }

    [HttpPost]
    [ValidateAntiForgeryToken]
    public async Task<ActionResult> Create(IFormCollection collection)
    {
        var message = new ServiceBusMessage
        {
            Title = collection["Title"],
            Message = collection["Message"]
        };
        await _queueService.SendMessageAsync(message);
        return RedirectToAction(nameof(Create));
    }
}
Remember to regiter your service in ConfigureServices method of Startup.cs:
services.AddTransient<IServiceBusQueueService, ServiceBusQueueService>();View
And the last thing - we need a place where user can type in the message and send it by clicking the button. In order to do that, you need to create a view. I used the basic view which can be generated automatically:
- Click RMB on Views folder.
- Choose Add -> View.
- Provide View name, e.g. Create and choose ServiceBusMessage as template.
Here’s ready razor page with some improvements I’ve made:
@model ServiceBusExample.WebApp.Models.ServiceBusMessage

@{
    ViewData["Title"] = "Create Service Bus Message";
}

<!DOCTYPE html>

<html>
<head>
    <meta name="viewport" content="width=device-width" />
    <title>@ViewData["Title"]</title>
</head>
<body>

<h4>Create new message:</h4>
<hr />
<div class="row">
    <div class="col-md-4">
        <form asp-action="Create">
            <div asp-validation-summary="ModelOnly" class="text-danger"></div>
            <div class="form-group">
                <label asp-for="Title" class="control-label"></label>
                <input asp-for="Title" class="form-control" />
                <span asp-validation-for="Title" class="text-danger"></span>
            </div>
            <div class="form-group">
                <label asp-for="Message" class="control-label"></label>
                <input asp-for="Message" class="form-control" />
                <span asp-validation-for="Message" class="text-danger"></span>
            </div>
            <div class="form-group">
                <input type="submit" value="Create" class="btn btn-primary" />
            </div>
        </form>
    </div>
</div>

@section Scripts {
    @{await Html.RenderPartialAsync("_ValidationScriptsPartial");}
}
</body>
</html>
Test solution
Now it’s time to test our solution. Start the aplication and go to https://localhost:xxxx/servicebusmessage/create. Fill in the form and click on the Create button.

Application form view.
If everything went well, you will see one message in the Active Message Count section of your queue inside Azure Portal.

Azure Service Bus Queue - messages view.
And that’s it - you’re ready to consume messages from your Service Bus with external application. ;)
Sources
Hero photo by Hal Gatewood on Unsplash.