Posted: 1/14/2018
W poprzednim poście dotyczącym projektu przygotowaliśmy wstępną wersję frontendu naszej aplikacji. Z użyciem Angulara wyświetliliśmy listę przykładowych wpisów na stronie głównej. Jak jednak dostarczyć prawdziwe dane do aplikacji? Z pomocą przychodzi .NET Core - przygotujemy w nim Web API, które będzie odpowiadało za backend projektu.
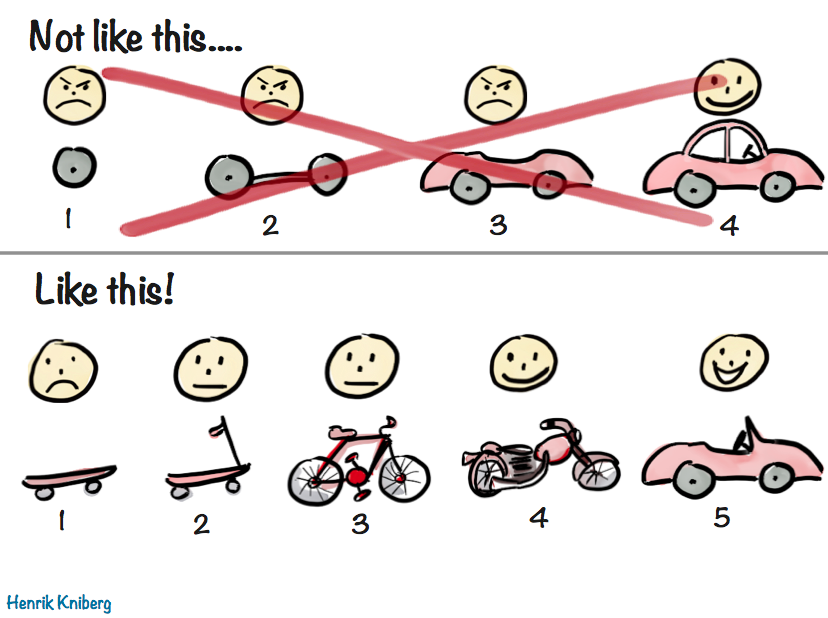
W trakcie prac nad projektem będziemy kierować się zasadą MVP (ang. Minimum Viable Project). Oznacza to, że zbudowana przez nas aplikacja ma posiadać minimum funkcji, jednak na tyle dużo, aby odpowiedzieć na pytanie, czy klienci są nim zainteresowani oraz dać wskazówki dot. dalszego rozwoju.
In the previous post related to the project, we’ve prepared an initial version of the frontend of our application. Using Angular we’ve displayed a list of example entries on the home page. But how we can provide data to our application? The .NET Core comes with help - we’ll prepare a Web API in it, which will be responsible for the backend of the project.
During the work on the project we’ll be guided by the MVP principle (Minimum Viable Project). This means that the application built by us has to have a minimum of functions, but enough to answer the question whether customers are interested in it and give tips on further development.
 źródło/source[/caption]
W dzisiejszym poście przedstawię, w jaki sposób zbudować bardzo proste API w technologii .NET Core (o której pisałem tutaj), składające się z jednego modelu oraz kontrolera. API będzie zwracało dane w formacie JSON, czyli zgodnym z formatem używanym w Angularowym module przygotowanym poprzednio.
In today’s post I’ll present how to built simple API in .NET Core (more about framework here), consisting of one model and controller. The API will return data in JSON format, which is compatible with the format used in the Angular module prepared previously.
Przygotowanie projektu / Preparing the project
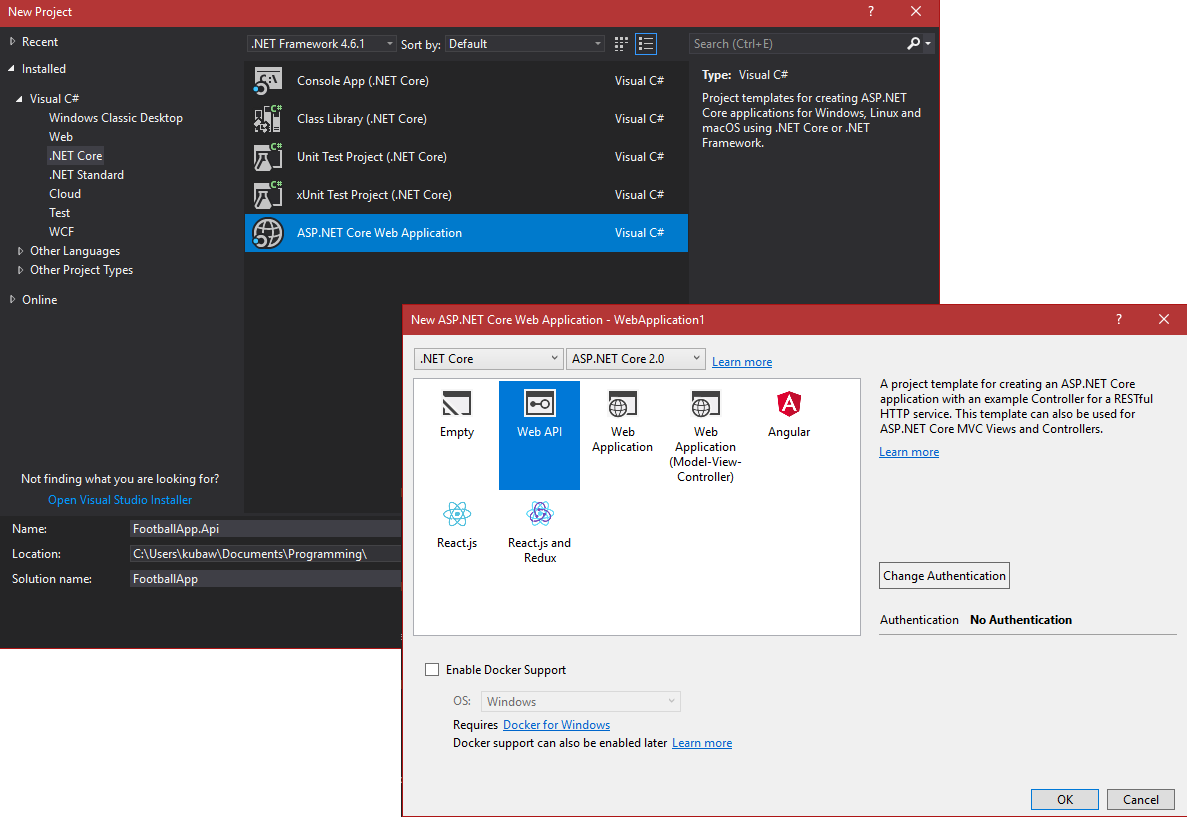
W pracach nad backendem aplikacji będziemy korzystać z Visual Studio Community 2017 oraz .NET Core w wersji 2.0. Pierwszym krokiem jest utworzenie nowego projektu (File -> New -> Project). VS posiada wbudowane szablony przykładowych dla frameworka .NET Core aplikacji. Z pierwszego menu wybieramy zestaw schematów ASP .NET Web Application. Następnie w kolejnym oknie zaznaczamy Web API.
During the work on the backend part of our app, we’ll use Visual Studio Community 2017 and .NET Core version 2.0. The first step is to create new project (File -> New -> Project). VS has built-in sample templates for the .NET Core applications. Choose set of ASP .NET Web Application templates from first menu. In the next window we mark the Web API_._
Visual Studio utworzył za nas całą strukturę “gotowej” aplikacji wraz z przykładowym kontrolerem. O tym, że API już w tak okrojonej formie jest zdatne do użytku możemy się przekonać kompilując kod (Ctrl+F5). Przeglądarka powinna automatycznie przekierować nas pod adres domyślnego kontrolera w API.
Visual Studio created for us the entire structure of “ready” application with an example controller. We can convince ourselves that API in such a truncated form is usable, compiling the code (Ctrl+F5). Browser should automatically redirect you to the default controller’s address in the API.
Pierwszy model / First data model
W dzisiejszym poście przygotujemy pierwszą z funkcji API, której zadaniem będzie zwracanie danych w formacie JSON. Zaczynamy od utworzenia modelu danych. Wewnątrz projektu tworzymy nowy folder o nazwie Models i dodajemy w nim nową klasę (PPM -> Add -> Class) o nazwie PostedLink. Będzie ona reprezentowała pojedynczy wpis (link) dodany przez użytkownika. Tworzymy w niej odpowiednie właściwości: ID, tytuł, adres url, opis i liczbę głosów (autora i listę komentarzy na razie pomijamy).
In today’s post we’ll prepare the first API function that will return data in JSON. We start by creating data model. Inside the project, we create a new folder called Models and add a new PostedLink class in it (RMC -> Add -> Class). It will represent a single entry (link) added by the user. We create appropriate properties in it: ID, title, url, description and number of votes (author and list of comments are skipping for now).
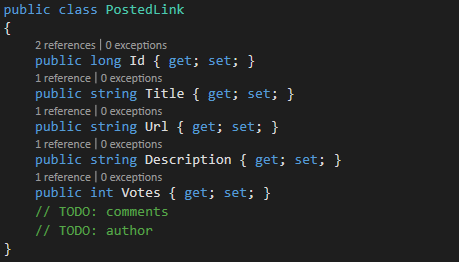
Rzeczy, które chcemy wykonać później, możemy oznaczyć komentarzem TODO. Będą one widoczne w zakładce Task List (Ctrl+W, T).
We can mark the things we want to do later with a TODO comment. They will be visible in the Task List tab (Ctrl+W, T)
Kontekst / Context
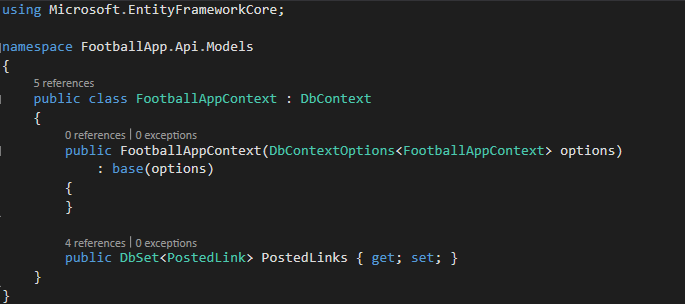
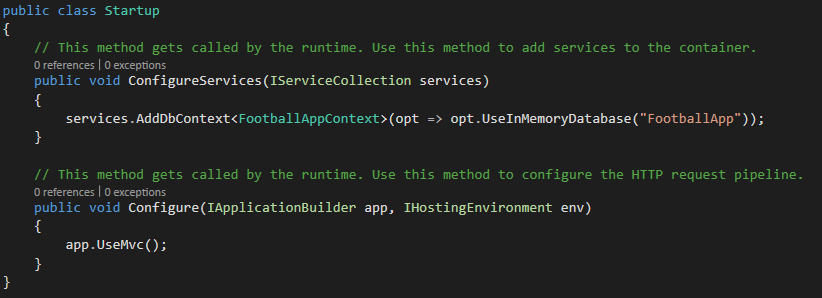
Kolejnym krokiem będzie utworzenie kontekstu bazy danych - głównej klasy, która zarządza funkcjonalnościami dla danego modelu danych w Entity Framework Core, z którego będziemy korzystać. Kontekst tworzy się poprzez odziedziczenie po klasie DbContext, która należy do frameworka Entity. Następnie tworzymy pusty konstruktor oraz DbSet PostedLinks - obiekt, który reprezentuje tabelę w bazie danych zawierającą wszystkie dodane linki.
The next step will be to create a database context - the main class that manages the functionalities for a given data model in Entity Framework Core that we’ll use. The context is created by inheriting from the DbContext class, which belongs to the Entity framework. Next, we create an empty contructor and DbSet PostedLinks - an object that represents table in database, containing all the links added.
Przygotowany kontekst należy następnie zarejestrować. Oznacza to, że należy wstrzyknąć go do kontenera zależności (ang. Dependency injection container), a dokładniej metody ConfigureServices w pliku Startup.cs. Dzięki temu będzie on dostępny do wykorzystania w kontrolerze, który napiszemy w kolejnym kroku.
Prepared context should then be registered. This means that it should be injected into Dependency injection container_, more specifically - to_ ConfigureServices method in the Startup.cs file. Thanks to this, it’ll be available for use in the controller, which we will write in the next step.
Kontroler / Controller
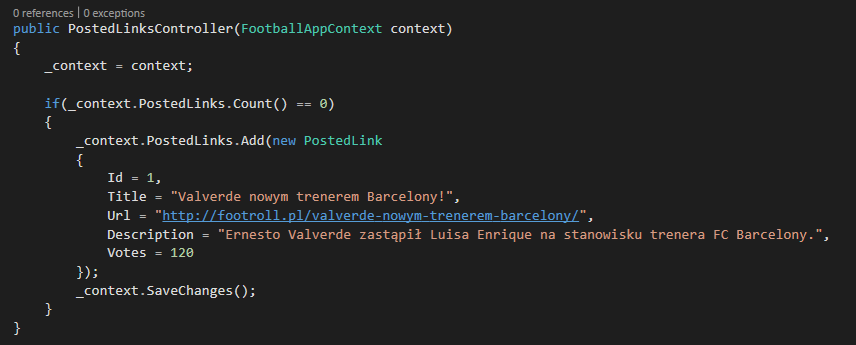
Kontroler odpowiada za komunikację pomiędzy warstwą danych a interfejsem użytkownika. Na początek przygotujemy dwie najprostsze metody - GetAll pobierającą wszystkie dane oraz GetById pobierającą dane pojedynczego elementu o zadanym id.
Na ten moment naszym źródłem danych będzie sztucznie wprowadzony wpis, wewnątrz konstruktora naszego kontrolera. Docelowo dane będą pobierane z bazy danych.
Controller is responsible for communication between data layer and user interface. At the beginning, we’ll prepare the two simplest methods - GetAll that retrieves all data and GetById that retrieves the data of a single element with the given id.
At this moment, our data source will be hardcoded inside our controller constructor. Ultimately, the data will be downloaded from the database.
Pora zaimplementować wspomniane wcześniej metody. GetAll jest bardzo prostą metodą - parsuje dane o postach pobrane z kontekstu do zwykłej listy. Dane zwracane są w postaci JSONa.
It’s time to implement the aforementioned methods. GetAll is a very simple method - it just parses data about posts taken from the database context to a regular list. The data is returned as JSON.
[HttpGet]
public JsonResult GetAll()
{
    return Json(_context.PostedLinks.ToList());
}
Druga z metod jest trochę bardziej rozbudowana. Za pomocą wyrażenia w Linqu pobieramy element o zadanym id. Następnie zwracamy ten element lub, jeśli element nie istnieje, kod błędu 404.
The second method is a little more expanded. We get the element with given id using the Linq expression. Next, we return this element or, if it doesn’t exist, http code 404.
[HttpGet("{id}", Name = "GetPostedLink")]
public IActionResult GetById(long id)
{
    var item = _context.PostedLinks.FirstOrDefault(t => t.Id == id);
    if (item == null)
    {
        return NotFound();
    }
    return new JsonResult(item);
}
Pozostaje już tylko zdefiniować routing, czyli url pod jakim będzie można odwołać się do poszczególnych metod naszego kontrolera. W tym celu przed definicją klasy dodajemy atrybut Route i ścieżkę. Domyślnie jest to nazwa kontrolera.
The only thing left is to define route paths - url at which you can refer to the particular methods of our controller. For this purpose, we add the Route attribute and path before the class definition. By default, it’s a controller class name.
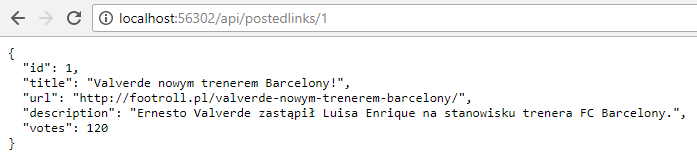
[Route("api/postedlinks")]W atrybucie HttpGet metody GetById dodaliśmy dopisek “{id}”. Oznacza ona, że id podane w urlu zostanie użyte jako parametr wywołania metody. W skrócie, wchodząc w przeglądarce pod url z id = 1, pobierzemy szczegółowe dane elementu w bazie o id 1.
Domyślną akcją dla naszego kontrolera jest GetAll. Z tego powodu nie definiowaliśmy dla niej dodatkowego routingu. Jest dostępna pod url podanym przed definicją klasy, czyli /api/postedlinks.
In HttpGet attribute, GetById method has been added with the entry “{id}”. It means, that the id specified in url will be used as the method call parameter. In short, entering the url with id = 1 in the browser, we’ll retrieve the details of the element with id 1 in the database.
The default action of our controller is GetAll_. From this reason we didn’t define additional routing for it. It’s available under the url given before the class definition - /api/postedlinks.
Podsumowanie / Summary
Przygotowaliśmy najprostszy flow naszej aplikacji - od modelu danych (pojedynczego wpisu na stronie) do kontrolera pobierającego dane (jak na razie wprowadzone “na sztywno” w kodzie aplikacji) na żądanie użytkownika.
Efektem są dane w formacie JSON, które można łatwo zintegrować z kodem angularowym, który powstał w poprzednim poście lub jakąkolwiek inną aplikacją frontendową. Spełniliśmy również założenie MVP wspomniane na początku posta - otrzymany produkt, chociaż o bardzo okrojonej funkcjonalności, jest działającym api. ;)
We’ve created the simplest flow of our application - from the data model (single posted link on the website) to the controller downloading the data (as so far introduced “rigidly” in the application code) at the user’s request.
The result is data in the JSON, which can be easily integrated with the angular code that was created in the previous post or any other frontend application. We also fullfilled the MVP assumption mentioned at the beginning of the post - the product obtained, although with very limited functionality, is an operating api. ;)